Upgrade Ubuntu 14.04 LTS to Ubuntu 16.04 LTS


Introduction

With the release of Ubuntu 16.04 LTS now just a couple of days away you may be trying to decide whether to upgrade or not. Well, we’re here to complicate matters by showing you how to do it, both before this Thursday’s release and after it.  “Ask yourself: ‘Do I really need to upgrade right now?'” So if you’re wondering how to upgrade Ubuntu 14.04 LTS to Ubuntu 16.04 LTS, read on; we’re here to walk you through the process step-by-step.

Is Performing an LTS-to-LTS Upgrade Recommended?

Like the version you are upgrading from, Ubuntu 16.04 is a Long Term Support release. It will receive critical bug fixes and security updates from Canonical for 5 years. A device running Ubuntu 14.04 LTS will only tell you there is a new Ubuntu update after the first point release goes live. 
In Xenial’s case that’s July. In short: you won’t be notified of an upgrade this week. But you don’t have to wait until the system gets around to telling you. You can upgrade right now.Or you can download the ISO file .

Prerequisites

This guide assumes that you have a system running Ubuntu 14.04, configured with a non-root user with sudo privileges for administrative tasks.

1 .Back Up Your System

Before attempting a major upgrade on any system, you should make sure you won't lose data if the upgrade goes awry. The best way to accomplish this is to make a backup of your entire filesystem. Failing that, ensure that you have copies of user home directories, any custom configuration files, and data stored by services such as relational databases.

2 .Upgrade Currently Installed Packages

$ sudo apt-get update

Next, upgrade installed packages to their latest available versions:

$ sudo apt-get upgrade

This process may take some time. Once it finishes, use the dist-upgrade command, which will perform upgrades involving changing dependencies, adding or removing new packages as necessary. This will handle a set of upgrades which may have been held back by apt-get upgrade:

$ sudo apt-get dist-upgrade

3 .Use Ubuntu's do-release-upgrade Tool to Perform Upgrade

First, make sure you have the update-manager-core package installed:

$ sudo apt-get install update-manager-core

Start by running do-release-upgrade with no options:

$ sudo do-release-upgrade

4 .Check your version release now !

Run this option:

$ lsb_release -a


This is the screenshot form my computer it's now ubuntu 16.04 :D !

write your own facebook post BOT

Introduction

Once ,I have attended a conferences about malware's and firmware exploitation and how it is important to keep yourself secure from this type of attacks ,but ,this actually ,have inspired me to start a new project and this time with BOT(s) ,In fact ,am looking for an advanced bot that can learn and act like humans ,however,the main question that has stacked in my mind is "How can be the ability of computers and robots if they learn the behavior of humans and act like them ?!" ,In addition ,with the machine learning today machines can learn things but,this is still limited for now .On the other hand ,how can hackers use this technique to their advantage by programming bots to do things without even get noticed by antivirus or firewall ,or IDS ! .

Abstract

This article shows you how to start writing your own facebook post bot without using any URL ,API,or external application ,Its an easy way to getting started with the technique to do the same thing .
watch DEMO

Main idea of the BOT

The main idea of the bot ,is to get the current coordination of the mouse pointer on the screen ,and through the current location we can get the couple of (X,Y) ,this helps us to locate any form or components on the screen ,so ,the bot simulate the mouse and the keyboard function . 

On facebook page we can get the coordination of the buttons ,form ,post field ........ and through this ,we focus on the component and execute commands . (this is only the first and the easiest part of the script we can go far with this and do anything almost ,just by developing some programs that can learn the user behavior and then act like them to do another thing :D {H4Ck3rs_L0VE_ThiS_StuFF} )

1.xdotool

What is xdotool? 

This tool lets you simulate keyboard input and mouse activity, move and resize windows, etc. It does this using X11's XTEST extension and other Xlib functions.

$ sudo apt-get install xdotool

2. Get the (X,Y) coordination

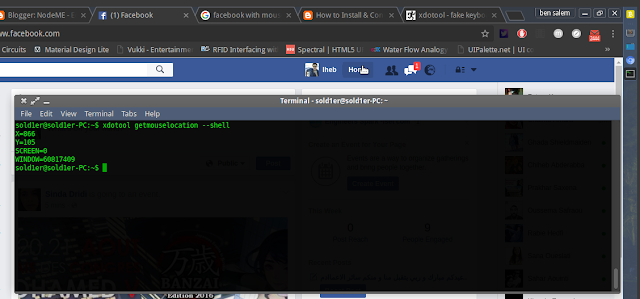
By using xdotool ,we can get the current position of the pointer on the screen .Move the pointer and focus on the field ,then execute xdotool with getmouselocation option .

now execute the xdotool tool to get the coordination

$ xdotool getmouselocation --shell


now we have all the coordination of the needed filed let's have fun

3. Bot script

You can download the script from my Github

#! /bin/sh
# This BOT developed by IhebBenSAlem@ihebskiSoft 
# Read more about the topic visit :https://nodeme.blogspot.com
# ContactME:ihebbensalem.isetcom@gmail.com
echo "------B0T_RUN_NOW--------"
xdotool mousemove --sync 868 114 #(x,y) fb home page 
xdotool click 1 
sleep 2
xdotool mousemove --sync 536 211 #select the post form
xdotool click 1
sleep 2 #wait ,timeout of refresh 
#---- Inject the message or text--------#
xdotool key i 
xdotool key h
xdotool key e
xdotool key b
xdotool key s
xdotool key k
xdotool key i
xdotool key B
xdotool key 0
xdotool key t
xdotool key T
xdotool key 3
xdotool key S
xdotool key t
#-----END TXT --------#
sleep 2
xdotool mousemove --sync 718  274 # post button
xdotool click 1
clear
echo "[=======================] 100%"
echo "------Done ! --------"
now ,execute the bash file ,and here is it :D ,it works !

4.Security threads ?!

the reason behind this title that this method can be really dangerous ,if it's manipulated by hackers because the bash script simulates the legal peripherals of the computer (Mouse ,Keyboard) so ,the attack can not be detected by any protection software such as Antivirus ,Firewall ,IDS....IPS ..... or even the most advanced one with the latest updates ! .With the machine learning, this can be really dangerous because ,the machine can manipulate their self by just analyze the users behavior and this leads to getting some credential things or open ports , download files,malware from the internet or other .

5 .What's next ?!

now it is your turn to write some advanced bot through this basic script ,python have a dozen of libraries helps you to write the most sophisticated script to build powerful bots on the internet .This only the start

6. Note

THIS IS FOR EDUCATIONAL AND INFORMATIONAL PURPOSES ONLY.

Chinese malware has infected 10 million android devices


Specialists assumed that more than 10 million android devices all over the world are infected by a virus caused by a Chinese company. A cybersecurity specialist at Check Point has discovered the malware which is called HummingBad. 

 Check point has published a report that shown that the malware contains multistage attack chain with two major components which infect androids when people surf certain websites. 

 The first part tries to gain root access on the device using rootkit; a software that seize various weaknesses, if the access went successful, attackers will get a full access to the device, otherwise, the second part will request the HummingBad system-level permission of the user to update their device system without letting the user notice that it’s a fake one. 

 As reported by Check-Point, Yingmob, a mobile advertising agency located in Beijing is behind the malware. It employs teams who develop legal tracking and ad platforms. The development Team for Overseas Platform is responsible for developing the malware components. 

 Cybersecurity mentioned in its report that Yinmob was using the malware in order to generate about $402,000 as profits from clicking ads as well as downloading apps.

How can you notice if your device is infected ?!

Fortunately, cybersecurity experts tend to detect the malware using different protective software such as : Check Point’s Zone Alarm, 360 Security’s Antivirus Boost, Avira Antivirus Security. These softwares aim to notify users of the existence of bad actors while using their devices

How can you respond to this Malware?

This malware becomes a reason to worry about on the coming days, so here are few methods to follow in order to get rid of the last. 

  1. Doing a persistent search of the malware and remove it manually. This is useful for experts in mobile apps. 
  2. The safest option yet it might be annoying since you’re going to lose all your data which is a factory reset of the phone

Hackers declared DDoS knocked Pokémon GO offline


If you’re a technophile, you would definitely know about the recent released game Pokémon GO that has been a success since its launch. The story behind this game went back to April 2014 fool when google sprinkled all the original 151 Pokémon around its map. At that time Niantic started working with the Pokémon Company to turn it into reality. Pokémon GO makes you cruise the real world while hunting Pokémon and locating gyms in which you will fight others! .

The first thing that comes to Niantic’s mind is that this game should aim to debilitate server issues. He was obliged to impede its global rollout so it provides additional server capacity, yet there still some days when the game won’t connect. This might be due to a hacking group called OurMine who claimed responsibility for the downtime. 

 It’s unbelievable that Pokémon GO is spreading faster day by day to the extent that some people will fall in a hole while they’re concentrating playing it in the street for example. It becomes an addiction for some. Niantic put out the game over additional 26 countries over the weekend which many criticized the problems caused by this over-spread release; The game actually was unreachable mostly on Saturdays, bringing up server errors whenever players tried to connect. As a result of this, OurMine carried out a DDoS attack on Niantic’s servers as a blame for the outage.


A stated by the representative of OurMine, the group’s main objective is to protect Niantics’s severs . So the best way to do so is to overflow the traffic. OurMine mentions that it will stop to attack Pokémon GO once someone from Niantic contacts them otherwise the attacks will remains until they get bored. They should be taught how to protect their servers, says OurMine. What’s happening with Niantic is similar to Lizard Squad hacks that attacked Xbox Live and PSN. 

 Niantic’s engineers are not likely to crawl back to some internet security rogues for security tips. Far from OurMine, PoodleCorp, a separate group , decided to schedule a Pokémon GO DDOs for august 1st hoping that Niantic will make a move toward controlling its servers .

Store documents and media files in MySQL and php


Abstract

 A PHP script can be used with a HTML form to allow users to upload files to the server. Initially files are uploaded and stored into MySQL database  by a PHP script.This tutorial is an attempt to show you  how to store binary files in MySQL using BOLB .

1.What is BOLB ?!

BLOB (Binary Large Object) is a large object data type in the database system. BLOB could store a large chunk of data, document types and even media files like audio or video files. BLOB fields allocate space only whenever the content in the field is utilized. BLOB allocates spaces in Giga Bytes.

  • USAGE OF BLOB :

You can write a binary large object (BLOB) to a database as either binary or character data, depending on the type of field at your data source. To write a BLOB value to your database, issue the appropriate INSERT or UPDATE statement and pass the BLOB value as an input parameter. If your BLOB is stored as text, such as a SQL Server text field, you can pass the BLOB as a string parameter. If the BLOB is stored in binary format, such as a SQL Server image field, you can pass an array of type byte as a binary parameter.

2. BOLB and MySQL

MySQL provides a BLOB type that can hold a large amount of data. BLOB stands for the binary large data object. The maximum value of a BLOB object is specified by the available memory and the communication package size. You can change the communication package size by using the max_allowed_packet variable in MySQL and post_max_size in the PHP settings.

3.Files

In your /www folder of wamp/Lamp server create this files to start the project 


  • Config.php : set the globle variables of our application
  • index.php: this is the main page where the upload form was created 
  • insert.php: link to the database and insert files 
  • download.php: fetch data from the database and force files to be downloaded .
  • show.php: list all files in the database 

4.Create the Database

Database name: mystore
Table name: file_upload

CREATE TABLE IF NOT EXISTS `file_upload` (
  `file_id` int(11) NOT NULL AUTO_INCREMENT,
  `name` text NOT NULL,
  `mime` text NOT NULL,
  `size` text NOT NULL,
  `data` blob NOT NULL,
  `ext` text NOT NULL,
  `date` timestamp NOT NULL DEFAULT CURRENT_TIMESTAMP ON UPDATE CURRENT_TIMESTAMP,
  PRIMARY KEY (`file_id`)
) ENGINE=InnoDB DEFAULT CHARSET=latin1 AUTO_INCREMENT=1 ;


5. config.php

<?php
define("host","_HOST_");
define("username","_USERNAME_");
define("password","_PASSOWRD_");
define("db","_DBname_");
?>

6. index.php


<!--
This application developed by ibsSOFT @NODEME blog
visit http://nodeme.blogspot.com
@ihebBenSalem
-->
<!DOCTYPE html>
<html lang="EN">
 <head>
  <meta charset="utf-8">
  <meta http-equiv="X-UA-Compatible" content="IE=edge">
  <meta name="viewport" content="width=device-width, initial-scale=1">
  <title>Upload</title>

  <!-- Bootstrap CSS -->
  <link href="//netdna.bootstrapcdn.com/bootstrap/3.3.4/css/bootstrap.min.css" rel="stylesheet">

  <!-- HTML5 Shim and Respond.js IE8 support of HTML5 elements and media queries -->
  <!-- WARNING: Respond.js doesn't work if you view the page via file:// -->
  <!--[if lt IE 9]>
   <script src="https://oss.maxcdn.com/libs/html5shiv/3.7.0/html5shiv.js"></script>
   <script src="https://oss.maxcdn.com/libs/respond.js/1.4.2/respond.min.js"></script>
  <![endif]-->
 </head>
 <body>

<center>


<form action="insert.php" method="POST" role="form" enctype = "multipart/form-data">
 <legend>Upload files</legend>

<label class="btn btn-default btn-file">
    Browse <input type="file" name="myfile">
</label>

 <button type="submit" class="btn btn-danger">Upload</button>
</form><br>
<a href="show.php">Show upload file list</a>
</center>

  <!-- jQuery -->
  <script src="//code.jquery.com/jquery.js"></script>
  <!-- Bootstrap JavaScript -->
  <script src="//netdna.bootstrapcdn.com/bootstrap/3.3.4/js/bootstrap.min.js"></script>
 </body>
</html>

7. insert.php


<?php
/*
This application developed by ibsSOFT @NODEME blog
visit http://nodeme.blogspot.com
@ihebBenSalem
*/
require("config.php");
if (isset($_FILES["myfile"])) {
$error=$_FILES["myfile"]["error"];

if ($error ==0) {
 # code...
 $db_link=mysqli_connect(host,username,password,db) or die("Can not connect to db !");

     if (mysqli_connect_errno()) {
     echo "Failed to connect to MySQL: " . mysqli_connect_error();
     }

}

$name = mysqli_real_escape_string($db_link,$_FILES['myfile']['name']);
$extension = strtolower(substr($name, strpos($name, '.') + 1));
$tmp_name = mysqli_real_escape_string($db_link,$_FILES['myfile']['tmp_name']);
$type = mysqli_real_escape_string($db_link,$_FILES['myfile']['type']);
$size = mysqli_real_escape_string($db_link,$_FILES['myfile']['size']);
$data=mysqli_real_escape_string($db_link,file_get_contents($tmp_name));


$sql="INSERT INTO file_upload (name,mime, size,ext,data) VALUES ('$name','$type','$size','$extension','$data')";

if (!mysqli_query($db_link,$sql)) {
  die('Error: ' . mysqli_error($con));
}
else
{
header("location:show.php");
}
}
?>

8. download.php

<?php
/*
This application developed by ibsSOFT @NODEME blog
visit http://nodeme.blogspot.com
@ihebBenSalem
*/
require("config.php");
if (isset($_GET["id"]) and !empty($_GET["id"])) {
 # code...
$id=$_GET["id"];
if ($id<=0) { //check the id is valid
 # code...
 die("Error in id ! try again");
}
  $con=new mysqli(host,username,password,db) or die(" Can not connect to db ! ");
  $result=$con->query(" SELECT file_id,  `mime` ,  `name` ,  `size` ,  `data` FROM  `file_upload` WHERE  `file_id` ='$id'  ");


   if($result) {
            // Make sure the result is valid
            if($result->num_rows == 1) {
            // Get the row
                $row = mysqli_fetch_assoc($result);
 
                // Print headers
                header("Content-Type: ". $row['mime']);
                header("Content-Length: ". $row['size']);
                header("Content-Disposition: attachment; filename=". $row['name']);
 
                // Print data
                ob_clean();
                flush();
                echo $row['data'];
            }
        }
}
?>

9. show.php


<?php
/*
This application developed by ibsSOFT @NODEME blog
visit http://nodeme.blogspot.com
@ihebBenSalem
*/
require("config.php"); 
$con=new mysqli(host,username,password,db);
     if (mysqli_connect_errno()) {
     echo "Failed to connect to MySQL: " . mysqli_connect_error();
     }
     $qy=$con->query(" SELECT * FROM `file_upload` order by date DESC;");
?>

<!DOCTYPE html>
<html lang="EN">
 <head>
  <meta charset="utf-8">
  <meta http-equiv="X-UA-Compatible" content="IE=edge">
  <meta name="viewport" content="width=device-width, initial-scale=1">
  <title>Show</title>

  <!-- Bootstrap CSS -->
  <link href="//netdna.bootstrapcdn.com/bootstrap/3.3.4/css/bootstrap.min.css" rel="stylesheet">

  <!-- HTML5 Shim and Respond.js IE8 support of HTML5 elements and media queries -->
  <!-- WARNING: Respond.js doesn't work if you view the page via file:// -->
  <!--[if lt IE 9]>
   <script src="https://oss.maxcdn.com/libs/html5shiv/3.7.0/html5shiv.js"></script>
   <script src="https://oss.maxcdn.com/libs/respond.js/1.4.2/respond.min.js"></script>
  <![endif]-->
 </head>
 <body>
<div class="well well-lg"><center><h3> Files List</h3></center> </div>
<a class="btn btn-default btn-block" href="index.php" role="button">Upload more files</a>

<table class="table table-hover">
 <thead>
  <tr>
   <th>#id</th>
   <th>#Name</th>
   <th>#Mime</th>
   <th>#size
</th>
   <th>#Extension</th>
   <th>#Download</th>
   <th>#Date</th>
  </tr>
 </thead>
 <tbody>

<?php
$counter=0;
while ($rs=$qy->fetch_array()) {
 # code...
 $counter++;
 echo '<tr>
 <td>'.$counter.'</td>
 <td>'.$rs[1].'</td>
 <td>'.$rs[2].'</td>
 <td>'.$rs[3].'</td>
 <td>'.$rs[5].'</td>
 <td>'.$rs[6].'</td>
 <td><a href="download.php?id='.$rs[0].'">Download</a>
 </td>
 </tr>';
}

?> 
 </tbody>
</table>

  <!-- jQuery -->
  <script src="//code.jquery.com/jquery.js"></script>
  <!-- Bootstrap JavaScript -->
  <script src="//netdna.bootstrapcdn.com/bootstrap/3.3.4/js/bootstrap.min.js"></script>
 </body>
</html>

10.Configure apache

By trying to upload huge files such as 1 G0 or even files in Mo this application, we'll not work well because by default the size supported by mysql server is limited to 16 M0 for allowing packet, and 16 M0 for max file size, so, obviously we need to change this configuration to upload files with big size.
open up your Terminal and let's go :D:

nano /etc/my.cnf 


and now :

add the line: max_allowed_packet=256M (obviously adjust size for whatever you need) 
under the [MYSQLD] section. He made a mistake of putting it at the bottom of the
file first so it did not work.
 
Press Ctrl+x  then Y to save the conf .
Now let's update the apache upload size :


sudo nano /etc/php5/apache2/php.ini
which will show you the actual maximum file size .change the 

upload_max_filesize 2M 2M
to 500M for exemple

Now Restart apache and mysql server

sudo service apache2 restart

sudo service mysql restart

11.Screenshots of the project


12.Download the project


Download the project from Github :bolb-in-php-and-mysql


Install Kali linux tools on ubuntu


Abstract

Kali is one of the most powerful penetration testing platforms on the market. It's a Linux distribution that can be installed and used for free to help you run just about every kind of network test imaginable.
A bunch of tools are pre installed in Kali linux ,its support all kind of security tools for hackers ,pentesters, or security experts. 
But for some, running Kali would be so much easier if it could be integrated with the likes of Ubuntu.This article shows you how to install all this tools using an easy script called "Katoolin".

1.What is Katoolin ?!

Katoolin is a script that helps to install Kali Linux tools on your Linux distribution of choice. For those of us who like to use penetration testing tools provided by Kali Linux development team can effectively do that on their preferred Linux distribution by using Katoolin.
Major Features of Katoolin
  • Adding Kali Linux repositories. 
  • Removing Kali Linux repositories. 
  • Installing Kali Linux tools.

Requirements


  • An operating system for this case we are using Ubuntu 14.04 64-bit. 
  • Python 2.7

2.Installation


sudo su
git clone https://github.com/LionSec/katoolin.git && cp katoolin/katoolin.py /usr/bin/katoolin
chmod +x /usr/bin/katoolin

3.Run the script


sudo katoolin

OUTPUT:


 Press 1 to select the first item
OUTPUT

 Now,Press again 1 to select the first item,after the add completed press "2" 

  • after the update now everything is ready to install .. type "back"

OUTPUT

Finally, press 2 to select the categories

OUTPUT


4. Warning !

After you have successfully  installed the tools ,don't forget to remove the repositories ,because an upgrade of the system could harm your ubuntu distribution .I have a private experience with Katoolin which have harmed my backbox and i was forced to reinstall it and lose my data .stay safe :D 


Write your own PHP MVC Framework [part 1]


Abstract

This article shows you how to start writing your own php mvc framework ,from the basic architecture to an advanced approach to build more module in your framework.Am sharing with you this method ,in the hope that it will be useful.
"Unless you try to do something beyond what you have already mastered, you will never grow.                                                                                                         -Waldo Emerson

1.What is MVC ?!         

MVC is a software architecture - the structure of the system - that separates domain/application/business (whatever you prefer) logic from the rest of the user interface. It does this by separating the application into three parts: the model, the view, and the controller. 

  •  The model manages fundamental behaviors and data of the application. It can respond to requests for information, respond to instructions to change the state of its information, and even to notify observers in event-driven systems when information changes. This could be a database, or any number of data structures or storage systems. In short, it is the data and data-management of the application. 
  •  The view effectively provides the user interface element of the application. It'll render data from the model into a form that is suitable for the user interface. 
  •  The controller receives user input and makes calls to model objects and the view to perform appropriate actions. All in all, these three components work together to create the three basic components of MVC.
For more information visit this link :introduction to the mvc_framework

2.Architecture

The architecture is a combination of a front controller on the server and model-view-controller design pattern and a directory structure ,that makes adding features in a self contained modular way easy. We will delve into each of these core architectural components in turn below.
Directory structure


3.Configure Apache


sudo a2enmod rewrite

For and change AllowOverride None to AllowOverride All. This may be on lines 7 and 11 of /etc/apache2/sites-available/default. Modern versions of Ubuntu store these in the main config file: /etc/apache2/apache2.conf.

sudo nano /etc/apache2/apache2.conf

Now restart your apache server :

sudo service apache2 restart


4.The front controller: index.php

The first key point is that all site traffic is directed through index.php. This is a common design pattern called the front controller which allows us to load components used by the whole application such as user sessions and database connection in one place. We use mod_rewrite to make the URL look clean, converting:
myframework/user/login
to:
myframework/index.php?q=user/login

index.php then fetches the property q with $_GET['q']. using q as a command to tell the application what to do.


5.Build it


Start by creating a folder in your LAMP server /var/www directory lets call it framework Create a new file called .htaccess and open it in your favourite code editor, copy and paste the following code into the .htaccess file:
 .htaccess:


# Don't show directory listings for URLs which map to a directory.
Options -Indexes

# Set the default handler.
DirectoryIndex index.php

# Various rewrite rules.

  RewriteEngine on
  # Rewrite URLs of the form 'x' to the form 'index.php?q=x'.
  RewriteCond %{REQUEST_FILENAME} !-f
  RewriteCond %{REQUEST_FILENAME} !-d
  RewriteCond %{REQUEST_URI} !=/favicon.ico
  RewriteRule ^(.*)$ index.php?q=$1 [L,QSA]


This script tells Apache that whenever a HTTP request arrives and if no physical file (!-f) or path (!-d) or symbolic link (!-l) can be found, it should transfer control to index.php, which is the front controller. Next create a new file called index.php, to illustrate what the .htaccess file does add the following two lines to index.php.

<?php

echo "q=".$_GET['q'];
?>
Next: navigate to http://localhost/framework/stories/list.json in your browser and you should see the following:
q=stories/list.json

As you can see the stories/list.json part has been passed to index.php as a string rather than navigating to an actual folder and file location.

1) Decoding the route

Next we want to decode the "stories/list.json" so that we can use it in our application, in this example: 


  • stories is the controller (the module we want to use) 
  • list is the action 
  • json is the format

Copy and paste the following into index.php:

<?php

require "route.php";
$route = new Route($_GET['q']);

echo "The requested controller is: ".$route->controller."<br>";
echo "The requested action is: ".$route->action."<br>";
echo "The requested format is: ".$route->format."<br>";


and create a file called route.php with the following:

<?php

class Route
{
    public $controller = '';
    public $action = '';
    public $subaction = '';
    public $format = "html"; 

    public function __construct($q)
    {
        $this->decode($q);
    }

    public function decode($q)
    {
        // filter out all except a-z and / .
        $q = preg_replace('/[^.\/A-Za-z0-9]/', '', $q);

        // Split by /
        $args = preg_split('/[\/]/', $q);

        // get format (part of last argument after . i.e view.json)
        $lastarg = sizeof($args) - 1;
        $lastarg_split = preg_split('/[.]/', $args[$lastarg]);
        if (count($lastarg_split) > 1) { $this->format = $lastarg_split[1]; }
        $args[$lastarg] = $lastarg_split[0];

        if (count($args) > 0) { $this->controller = $args[0]; }
        if (count($args) > 1) { $this->action = $args[1]; }
        if (count($args) > 2) { $this->subaction = $args[2]; }
    }
}


Navigate again to http://localhost/framework/stories/list.json in your browser and you should see the following:

The requested controller is: stories
The requested action is: list
The requested format is: json


For more information visit this documentation  of the community  src:_Link_
note:this framework have inspired me to build my own framework .
@emoncms

make real Time charts with Flot


1.Introduction

In this post we will be talking about how to to make real time progressing chart , to be frank i had been searching for a selections for a quit a while ,now and the best solution ,i have came up with so far is to use flot , flot framework  is a good way to do plotting , its ,fast,free and open source.

2.Flot VS Google charts !?

Flot :

  1. jQuery plugin : if you are familiar with jQuery (or if your apps is integrated with jQuery), it seems natural to use Flot
  2. Offline visualization : you can test or have it installed into an internal website. Google Visu can only work if you have acces to the google website !!
  3. Customization : this is basically a JavaScript file so if you are good at JS coding, you can customize your charts as your convenience. Also the Flot plugin system allows you better modularity
Google charts :
  1. Documentation : awesome ! Examples for each type of graphs are available in the Google site
  2. Easy to use : Really. Easier than Flot (that requires to somehow customize the div container)
  3. Powerful : you have many sorts of graphs and features (zooming, interactivity,...)

3.Requirement


  • Flot library Flot_library
  • Sublime edit Text
  • Wamp server/EasyPHP or other ...
  • Jquery CDN

4.Files

start your Wamp server and then create this files in WWW folder (C:/wamp/www)


5.index.php


<!-- NodeME{2016} @iheb_b3N_Sal3m  !-->
<script src="flot/jquery.min.js"></script>
<!--[if lte IE 8]><script language="javascript" type="text/javascript" src="http://static.pureexample.com/js/flot/excanvas.min.js"></script><![endif]-->
<script type="text/javascript" src="flot/jquery.flot.min.js"></script>
<script type="text/javascript" src="flot/jquery.flot.time.js"></script>    
<script type="text/javascript" src="http://static.pureexample.com/js/flot/jquery.flot.axislabels.js"></script>

<!-- CSS -->
<style type="text/css">
#flotcontainer {
    width: 600px;
    height: 200px;
    text-align: center;
    margin: 0 auto;
}
</style>

<!-- Javascript -->
<script>
var data = [];
var dataset;
var totalPoints = 50;
var updateInterval = 1000;
var now = new Date().getTime();


function get_feeds_from_the_db()//ajax request to get the finale data from backend
{


return $.ajax({
      url: "Get_feeds.php"
  });

}


function GetData(i) {
    data.shift();

    while (data.length < totalPoints) {   
        var y=i;//axe_y
        var temp = [now += updateInterval, y];//axe_x
        data.push(temp);
    }
}

var options = {
    series: {
        lines: {
            show: true,
            lineWidth: 1.2,
            fill: true
        }
    },
    xaxis: {
        mode: "time",
        tickSize: [2, "second"],
        tickFormatter: function (v, axis) {
            var date = new Date(v);

            if (date.getSeconds() % 20 == 0) {
                var hours = date.getHours() < 10 ? "0" + date.getHours() : date.getHours();
                var minutes = date.getMinutes() < 10 ? "0" + date.getMinutes() : date.getMinutes();
                var seconds = date.getSeconds() < 10 ? "0" + date.getSeconds() : date.getSeconds();

                return hours + ":" + minutes + ":" + seconds;
            } else {
                return "";
            }
        },
        axisLabel: "Time",
        axisLabelUseCanvas: true,
        axisLabelFontSizePixels: 12,
        axisLabelFontFamily: 'Verdana, Arial',
        axisLabelPadding: 10
    },
    yaxis: {
        min: 0,
        max: 100,        
        tickSize: 5,
        tickFormatter: function (v, axis) {
            if (v % 10 == 0) {
                return v + "%";
            } else {
                return "";
            }
        },
        axisLabel: "CPU loading",
        axisLabelUseCanvas: true,
        axisLabelFontSizePixels: 12,
        axisLabelFontFamily: 'Verdana, Arial',
        axisLabelPadding: 6
    },
    legend: {        
        labelBoxBorderColor: "#fff"
    }
};

$(document).ready(function () {
    GetData();

    dataset = [
        { label: "temperature", data: data }
    ];

    $.plot($("#flotcontainer"), dataset, options);

    function update() {
        var promise = get_feeds_from_the_db();
  promise.success(function (data) {
  console.log(data);//console output to check the function
        GetData(data);
        $.plot($("#flotcontainer"), dataset, options)
        setTimeout(update, updateInterval);
       

});

    }

    update();
});


</script>

<!-- HTML -->
<!-- Your app starts here!!   -->
<div id="flotcontainer"></div>


6.Get_feeds.php

This this is the logic page of our application .If you need to fetch data from the data base you w'll just connect to your host server ,get the feeds ,then echo the out put .
<?php
/*--------------------------------------
write your code here,if u need to get feeds from
mySQL data base


-----------------------------------------*/


echo rand(0,100); //generate random number between 0<y<100

?>

7.Screenshot


8.Download demo


9.Watch the live demo here :


Google charts and MySQL


I was working on some projects that needs to use charts in the application ,so ,after a long search in the web ,here is my solution . 
right now I am developing two types of charts 
  •  real Time 
  • Static charts 
In this article, I will show your how to fetch data from database to use it on the google Line charts to create beautiful and customisable charts for your future projects. . 

1.Introduction

It is practically impossible to imagine any dashboard without graphs and charts. They present complex statistics quickly and effectively. Additionally, a good graph also enhances the overall design of your website.

2.What is google charts ?

The Google Chart API is a tool that lets people easily create a chart from some data and embed it in a web page. Google creates a PNG image of a chart from data and formatting parameters in an HTTP request.
read more :GoogleAPI

3.Files

start your Wamp server and then create this files in WWW folder (C:/wamp/www)

config.php:define the settings for the application
get_feeds:fetch data from data base 

4.Create database

Database name is :google_charts
table name:mychart    

CREATE TABLE IF NOT EXISTS `mychart` (
  `id` int(11) NOT NULL AUTO_INCREMENT,
  `axe_x` text NOT NULL,
  `axe_y` text NOT NULL,
  `time` timestamp NOT NULL DEFAULT CURRENT_TIMESTAMP ON UPDATE CURRENT_TIMESTAMP,
  PRIMARY KEY (`id`)
) ENGINE=InnoDB  DEFAULT CHARSET=latin1 AUTO_INCREMENT=101 ;

--
-- Contenu de la table `mychart`
--

INSERT INTO `mychart` (`id`, `axe_x`, `axe_y`, `time`) VALUES
(1, '0', '30', '2016-04-13 20:52:15'),
(2, '1', '90', '2016-04-13 20:52:15'),
(3, '2', '36', '2016-04-13 20:52:16'),
(4, '3', '85', '2016-04-13 20:52:16'),
(5, '4', '87', '2016-04-13 20:52:16'),
(6, '5', '10', '2016-04-13 20:52:16'),
(7, '6', '25', '2016-04-13 20:52:16'),
(8, '7', '87', '2016-04-13 20:52:16'),
(9, '8', '28', '2016-04-13 20:52:16'),
(10, '9', '32', '2016-04-13 20:52:16'),
(11, '10', '68', '2016-04-13 20:52:16'),
(12, '11', '42', '2016-04-13 20:52:16'),
(13, '12', '11', '2016-04-13 20:52:16'),
(14, '13', '60', '2016-04-13 20:52:16'),
(15, '14', '91', '2016-04-13 20:52:16'),
(16, '15', '85', '2016-04-13 20:52:16'),
(17, '16', '7', '2016-04-13 20:52:16'),
(18, '17', '75', '2016-04-13 20:52:16'),
(19, '18', '29', '2016-04-13 20:52:16'),
(20, '19', '40', '2016-04-13 20:52:16'),
(21, '20', '22', '2016-04-13 20:52:16'),
(22, '21', '92', '2016-04-13 20:52:17'),
(23, '22', '28', '2016-04-13 20:52:17'),
(24, '23', '30', '2016-04-13 20:52:17'),
(25, '24', '56', '2016-04-13 20:52:17'),
(26, '25', '45', '2016-04-13 20:52:17'),
(27, '26', '86', '2016-04-13 20:52:17'),
(28, '27', '18', '2016-04-13 20:52:17'),
(29, '28', '74', '2016-04-13 20:52:17'),
(30, '29', '84', '2016-04-13 20:52:17'),
(31, '30', '29', '2016-04-13 20:52:17'),
(32, '31', '4', '2016-04-13 20:52:17'),
(33, '32', '73', '2016-04-13 20:52:17'),
(34, '33', '65', '2016-04-13 20:52:17'),
(35, '34', '89', '2016-04-13 20:52:17'),
(36, '35', '59', '2016-04-13 20:52:17'),
(37, '36', '75', '2016-04-13 20:52:17'),
(38, '37', '13', '2016-04-13 20:52:17'),
(39, '38', '46', '2016-04-13 20:52:17'),
(40, '39', '2', '2016-04-13 20:52:17'),
(41, '40', '45', '2016-04-13 20:52:18'),
(42, '41', '13', '2016-04-13 20:52:18'),
(43, '42', '44', '2016-04-13 20:52:18'),
(44, '43', '55', '2016-04-13 20:52:18'),
(45, '44', '73', '2016-04-13 20:52:18'),
(46, '45', '34', '2016-04-13 20:52:18'),
(47, '46', '40', '2016-04-13 20:52:18'),
(48, '47', '79', '2016-04-13 20:52:18'),
(49, '48', '8', '2016-04-13 20:52:18'),
(50, '49', '68', '2016-04-13 20:52:18'),
(51, '50', '19', '2016-04-13 20:52:18'),
(52, '51', '30', '2016-04-13 20:52:18'),
(53, '52', '60', '2016-04-13 20:52:18'),
(54, '53', '46', '2016-04-13 20:52:18'),
(55, '54', '60', '2016-04-13 20:52:18'),
(56, '55', '15', '2016-04-13 20:52:18'),
(57, '56', '91', '2016-04-13 20:52:18'),
(58, '57', '45', '2016-04-13 20:52:18'),
(59, '58', '33', '2016-04-13 20:52:18'),
(60, '59', '65', '2016-04-13 20:52:19'),
(61, '60', '28', '2016-04-13 20:52:19'),
(62, '61', '61', '2016-04-13 20:52:19'),
(63, '62', '68', '2016-04-13 20:52:19'),
(64, '63', '1', '2016-04-13 20:52:19'),
(65, '64', '26', '2016-04-13 20:52:19'),
(66, '65', '57', '2016-04-13 20:52:19'),
(67, '66', '60', '2016-04-13 20:52:19'),
(68, '67', '100', '2016-04-13 20:52:19'),
(69, '68', '70', '2016-04-13 20:52:19'),
(70, '69', '5', '2016-04-13 20:52:19'),
(71, '70', '2', '2016-04-13 20:52:19'),
(72, '71', '14', '2016-04-13 20:52:19'),
(73, '72', '18', '2016-04-13 20:52:19'),
(74, '73', '45', '2016-04-13 20:52:19'),
(75, '74', '68', '2016-04-13 20:52:19'),
(76, '75', '90', '2016-04-13 20:52:19'),
(77, '76', '79', '2016-04-13 20:52:19'),
(78, '77', '7', '2016-04-13 20:52:19'),
(79, '78', '69', '2016-04-13 20:52:19'),
(80, '79', '87', '2016-04-13 20:52:19'),
(81, '80', '75', '2016-04-13 20:52:19'),
(82, '81', '87', '2016-04-13 20:52:19'),
(83, '82', '16', '2016-04-13 20:52:20'),
(84, '83', '34', '2016-04-13 20:52:20'),
(85, '84', '33', '2016-04-13 20:52:20'),
(86, '85', '76', '2016-04-13 20:52:20'),
(87, '86', '49', '2016-04-13 20:52:20'),
(88, '87', '24', '2016-04-13 20:52:20'),
(89, '88', '20', '2016-04-13 20:52:20'),
(90, '89', '81', '2016-04-13 20:52:20'),
(91, '90', '88', '2016-04-13 20:52:20'),
(92, '91', '48', '2016-04-13 20:52:20'),
(93, '92', '42', '2016-04-13 20:52:20'),
(94, '93', '56', '2016-04-13 20:52:20'),
(95, '94', '48', '2016-04-13 20:52:20'),
(96, '95', '67', '2016-04-13 20:52:20'),
(97, '96', '13', '2016-04-13 20:52:20'),
(98, '97', '7', '2016-04-13 20:52:20'),
(99, '98', '66', '2016-04-13 20:52:20'),
(100, '99', '82', '2016-04-13 20:52:20');

5.Config.php

<?php
define("host","127.0.0.1");
define("username","_YOUR_USERNAME_");
define("pwd","YOUR_PASSWORD_");
define("db","test");
?>

6.index.php


<?php
require("get_feeds.php");
?>

<h3 align="center">Google LineCharts</h3>

<!-- CDN charts   !-->
<script type="text/javascript" src="https://www.gstatic.com/charts/loader.js"></script>
<!--END CDN charts   !-->


<!-- div to include the chart   !-->

<div id="chart_div"></div>

<!-- END div to include the chart   !-->


<script>
google.charts.load('current', {packages: ['corechart', 'line']});
google.charts.setOnLoadCallback(drawCrosshairs);

function drawCrosshairs() {
      var data = new google.visualization.DataTable();
      data.addColumn('number', 'X');
      data.addColumn('number', 'consumption');
      data.addRows(<?php echo $out; ?>);

      var options = {
        hAxis: {
          title: 'Time'
        },
        vAxis: {
          title: 'Percentage'
        },
        colors: ['#536dfe'],
        crosshair: {
          color: '#000',
          trigger: 'selection'
        }
      };

      var chart = new google.visualization.LineChart(document.getElementById('chart_div'));

      chart.draw(data, options);
      chart.setSelection([{row: 38, column: 1}]);

    }
    </script>
    

7.Screenshot


8.Download demo

9.Watch the live demo here :